A Visual Studio Look Alike ColorDialog For WPF
INTRODUCTION
When I was learning C# language, I got the idea that WPF has already replaced Win Form, so I jumped directly into WPF with absolutely zero knowledge of Win Form. You could understand why when I was faced with the problem of there being a no ColorDialog in WPF and people suggested using the Win Form solution, I saw it as a no solution. Well I googled and found this, (the best I could come up with at the time that is). I used it till at one time I needed to use it to set a color in my code to white and I couldn’t. That drew my attention to the limited capability of the implementation and the need for me to implement my own ColorDialog.
DESIGN
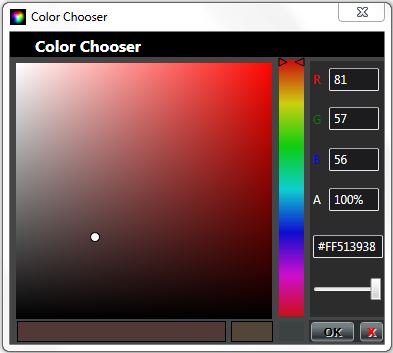
I started by observing in order to understand the workings of the ColorDialog inside the Visual Studio WPF designer because I wanted to implement something as close to it as possible. The end may not be as fast and probably represent fewer color than the goal, but it is a huge improvement from what I started with. I borrowed the idea of swap images from the link above, but instead of storing images, they are produced on the fly by setting the colors of the pixels of a WriteableBitmap. The Initialization of the WriteableBitmap is as follows;
private void
InitColorPalette()
{
writeableBitmap =
new
WriteableBitmap
(256, 256, 96, 96,
PixelFormats
.Bgr32,
null
);
ColorPalette.Source = writeableBitmap;
SearchColor(initialColor);
}
ColorPalette is an Image Element. By clicking on a canvas (SideBar for lack of a better name to call it), writeableBitmap is updated according to the height (with respect to SideBar) of the MouseEvent. The method below updates the position of pointers on the SideBar.
/// <summary>
///
Updates Pointer position on SideBar
///
Also Updates Class members Rmax, Gmax, and Bmax
/// </summary>
{
LeftPointer.SetValue(Canvas.TopProperty, (double)(y - 4));
RightPointer.SetValue(Canvas.TopProperty, (double)(y - 4));
if (y < 44)
{
Rmax = 255;
Gmax = 6 * y > 255 ? 255 : 6 * y;
Bmax = 0;
}
else if (y < 87)
{
Rmax = 255 - 6 * (y - 43) < 0 ? 0 : 255 - 6 * (y - 43);
Gmax = 255;
Bmax = 0;
}
else if (y < 130)
{
Rmax = 0;
Gmax = 255;
Bmax = 6 * (y - 86) > 255 ? 255 : 6 * (y - 86);
}
else if (y < 173)
{
Rmax = 0;
Gmax = 255 - 6 * (y - 129) < 0 ? 0 : 255 - 6 * (y - 129);
Bmax = 255;
}
else if (y < 216)
{
Rmax = 6 * (y - 172) > 255 ? 255 : 6 * (y - 172);
Gmax = 0;
Bmax = 255;
}
else if (y < 256)
{
Rmax = 255;
Gmax = 0;
Bmax = 255 - 6 * (y - 215) < 0 ? 0 : 255 - 6 * (y - 215);
}
UpdateColorPalette();
}
UpdateColorPalette() uses the updated values of the class variables Rmax, Gmax and Bmax to calculate the color of each pixel of writeableBitmap. The implementation is shown below.
{
for (int j = 0; j <= size; j++)
{
int rR = (int)(Rmax * (1 - ((double)j / size)));
int gR = (int)(Gmax * (1 - (j / (double)size)));
int bR = (int)(Bmax * (1 - (j / (double)size)));
int L = size - j;
for (int i = 0; i <= size; i++)
{
int r = (int)(L - (i * (L - rR) / size));
int g = (int)(L - (i * (L - gR) / size));
int b = (int)(L - (i * (L - bR) / size));
SetPixelColor(i, j, r, g, b);
}
}
}
The method loops through each pixel of writeableBitmap, setting the pixel to the calculated value. Note that the r, g, b components of the calculated color is dependent on the Rmax, Gmax and Bmax variables respectively which in turn depends on the position of the Pointers on the SideBar. The implementation of SetPixelColor( ) is given below.
{
// Reserve the back buffer for updates.
writeableBitmap.Lock();
unsafe
{
// Get a pointer to the back buffer.
int pBackBuffer = (int)writeableBitmap.BackBuffer;
// Find the address of the pixel to draw.
pBackBuffer += j * writeableBitmap.BackBufferStride;
pBackBuffer += i * 4;
// Compute the pixel's color.
int color_data = r << 16; // R
color_data |= g << 8; // G
color_data |= b << 0; // B
// Assign the color data to the pixel.
*((int*)pBackBuffer) = color_data;
}
// Specify the area of the bitmap that changed.
writeableBitmap.AddDirtyRect(new Int32Rect(i, j, 1, 1));
// Release the back buffer and make it available for display.
writeableBitmap.Unlock();
}
Clicking anywhere inside the ColorPalette copies the pixel under the mouse and sets the SelectedColor to the value. The concept was borrowed from the CodeProject which link was given above. In fact the code below was copied from the project. The small changes I made to it are only architectural related and not functional.
{
// Test to ensure positions is within pallete
if ((x < 0) || (y < 0) || (x > ColorPalette.Width - 1) || (y > ColorPalette.Height - 1)) return;
// Get the single pixel under the mouse into a bitmap and copy it to a byte array
CroppedBitmap cb = new CroppedBitmap(ColorPalette.Source as BitmapSource, new Int32Rect(x, y, 1, 1));
byte[] pixels = new byte[4];
cb.CopyPixels(pixels, 4, 0);
// Set the Selected Color based on the cursor pixel and Alpha Slider value
SelectedColor = Color.FromArgb((byte)ASlider.Value, pixels[2], pixels[1], pixels[0]);
}
IMPLEMENTATION
I implemented the ColorDialog as a class library for reusability. Surprising again that you can’t add a WPF window to this type of project in Visual Studio. To work around this I implemented it as a UserControl and hosted it inside a window. I created a window in the only public method of the class and set the content of the window to an instance of the UserControl.
{
window = new Window();
window.Title = "Color Chooser";
window.Icon = new BitmapImage(new Uri("pack://application:,,,/ChassUtils;component/Resources/Images/ColorSwatchCircle.png"));
window.ResizeMode = ResizeMode.NoResize;
window.Loaded += window_Loaded;
window.Content = this;
window.ShowDialog();
return DialogResult;
}
USAGE
To use the ColorDialog from your project, add a reference to the dll file, then call the ShowDialog method of an instance of the ColorDialog.
ColorDialog dialog = color == null ? new ColorDialog() : new ColorDialog(color.Color);
if (dialog.ShowDialog())
{
ColorDialog brush = new ColorDialog(dialog.SelectedColor);
}
IMPROVEMENTS
While the project that inspired this uses only three swat images, this project uses a total of 256 distinct images and this is only limited by the height of the SideBar. This hugely increased the number of colors that can be correctly represented. But while the size significantly reduced, there is a trade off in the speed of the application.
POINTS OF INTEREST
- Speed: I will definitely look into improving the speed.
- Color Range: In the complete project, I included a method to search for an initialColor passed to the constructor of the ColorDialog and set the state of the ColorPalette and SideBar appropriately, but for some given colors, the method fails to do this.
DOWNLOAD
Download Links: filehosting.org megafileupload.com 4shared.com


